 Skip to content
Netgear Extender Setup
and Installation
Netgear Extender Setup
Here are the steps below, how you can setup the Netgear extender:
- Plug in the extender. Power light will turn on and if not press the on/off button.
- Connect the computer or mobile device to the extender.
- The extender's default WiFi network name is NETGEAR_EXT. The extender network either has no password or the default password is password.
- Open the web browser and enter mywifiext.net or 192.168.1.250.
- Click on new extender setup.
- Select extender's admin credentials.
- After it select two security questions.
- Click or hit NEXT.
- After it follow the instructions on the screen.
- The device you want to connect, connect it with the extender network.
- The device is now connected with the extender network.
Netgear Range Extender Setup using Netgear_ext SSID
You can install a Netgear range ext via two methods: Manual method and WPS method. Let’s discuss both the methods one-by-one and make you understand how to setup Netgear WiFi extender with ease.
Netgear Extender Setup: Manual Method
The Netgear WiFi extender setup method, also referred to as web browser setup, involves following the instructions provided below to manually set up your Netgear extender using the Netgear_ext SSID.
- Turn on your Netgear range extender by plugging it into an electrical outlet.
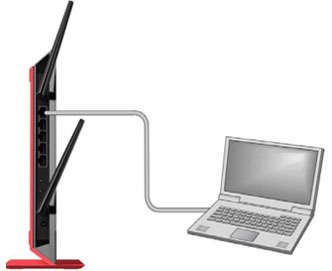
- Connect the extender and your router.
- Open any web browser of your choice.
- Navigate to the default mywifilogon.com web page.
- Create an account if you don't have already to get success with the Netgear extender login process.
- Enter the default Netgear extender login details to reach the setup wizard.
- Choose the network you want to extend.
- At last, click on the finish button.
Congratulations on successfully completing the new extender setup process using Netgear_ext! You are now free to place your Netgear range extender wherever you prefer and connect your client devices to the Netgear_ext SSID for seamless internet connectivity throughout your home.
How to Setup Netgear WiFi Extender Using WPS Method
To set up your Netgear WiFi extender using the WPS method, follow the steps below:

- Plug in your Netgear extender to a power outlet and wait for the power LED to turn solid green.
- Locate the WPS button on your Netgear extender and press it. The WPS LED will start to blink.
- Press the WPS button on your router within two minutes of pressing the WPS button on your Netgear extender.
- Wait for the WPS LED on your Netgear extender to turn solid green, indicating a successful connection.
Once the WPS connection is established, you can relocate your Netgear extender to a new location where you want to extend the WiFi coverage. Make sure the location you choose is within the range of your existing WiFi network. If your router doesn't have a WPS button, you can set up your Netgear extender manually using a web browser. Simply connect your computer or mobile device to the Netgear_ext SSID and follow the instructions to complete the setup process.
Netgear Extender Manual Setup: Without Ethernet Port
Not all Netgear extenders are created equal! Some models may not have an Ethernet port, which can cause confusion for users who are unsure how to set up their extender manually without one. If you are experiencing issues with your EX6200 model and the Netgear extender login page isn't loading, don't worry – we've got you covered.
Simply follow the steps below to complete a new extender setup without an Ethernet port in just a few minutes. No more waiting required!
- Reset your extender to the default factory settings.
- Next, connect to the extender device using a WiFi connection.
- Log in to the web user interface of your device.
- Once done, you will be prompted to enter the Netgear extender login username and your WiFi extender default password.
- After that, follow the steps of the installation wizard and establish a connection with your router.
- Lastly, connect your WiFi-compatible devices.
Still not able to complete your Netgear range extender setup? Get on-the-spot technical assistance from highly experienced technicians.
NETGEAR-EXT Setup
NETGEAR-EXT is the default extension that enables access to your WiFi range extender. Once you have installed your Netgear range extender through mywifiext.net, devices such as PCs, laptops, smartphones, and tablets can connect to WiFi using the extension.
To begin, power on your extender and wait for the power LED to turn green. Then, search for and connect to the Netgear_ext SSID (network name) to start using your range extender.
Major Issues During Netgear WiFi Extender Setup
- Entering the wrong web address.
- Using an outdated web browser that has accumulated cache, cookies, and browsing history.
- Using a static IP address on your computer.
- The extender may not be providing a fast internet connection.
- To avoid login issues, it's important to fix any of the above mistakes. However, if you have tried everything and are still unable to successfully log in to your Netgear extender, don't worry. Our experts are available to assist you with any problems you may be experiencing.
Why is my wifi extender so slow?
- Can’t access to mywifilogon.com local.
- Weak/Improper WiFi signal strength.
- Inadequate or improper WiFi router range.
- How to set up the default password of Netgear range ext.
- How to setup Netgear WiFi extender.
- Not able to connect to extender's default SSID.
- No blinking LEDs before/after extender setup
- Problems with extender port configuration and settings.
- Unable to Log In to extender's settings page.
- Lost/forgotten Netgear extender login password.
- Unable to proceed or login to NETGEAR Genie Smart Setup.
- Can't find the Netgear_ext (SSID).
Can I add one more Netgear extender to my home network?
Utilizing two Netgear extenders to amplify the coverage of your home network's wireless range is a great solution. However, avoid daisy-chaining the additional extender with the first one, as it can impact the performance of the wireless devices that are connected to your Netgear extender's network. Additionally, the second extender may not function optimally.
How do I get the best performance from my Netgear Nighthawk extender?
To achieve optimal performance from your Netgear Nighthawk extender, implement the following strategies:
- Place the Netgear extender in a zero-interference zone.
- Make sure not to select a corner to place your Netgear extender.
- Keep the firmware of your Netgear Nighthawk extender updated.
- Ensure that the Netgear extender and router are located in the same room.
Extend WiFi Speed with Netgear WiFi Repeater and Booster
Say goodbye to WiFi dead zones with the help of a WiFi extender setup. Dead zones can be frustrating areas in your home or workplace where WiFi signals cannot reach. Even the most powerful and high-speed router may miss certain spots due to interference from metal objects, reflective surfaces, architectural obstacles, and other devices within the environment. WiFi range extenders, also referred to as WiFi boosters and repeaters, are an excellent solution to revive dead zones and enhance the signal strength of your home WiFi network. Additionally, the WiFi booster comes with a manual to simplify the setup process like never before.
How Netgear Extender Works?
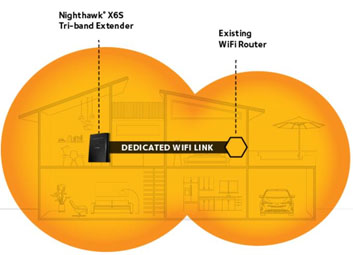
Netgear extenders are designed to expand the coverage area of your existing network. The Netgear range extender receives the current wireless signals, amplifies them using powerful antennas and repeaters, and ultimately extends the WiFi coverage area. With the WiFi range extender setup, you can effectively double your wireless network range, allowing you to access WiFi signals in every corner of your house or workplace, including different floors and even your yard.
What distinguishes WiFi extenders from other devices is their universal compatibility. These devices can function with any standard router from any brand, including the router you receive from your service provider, and boost the WiFi signals emitted by them.
Netgear WiFi Range Extender Design: Desktop or Wall-plug

Netgear wireless range extenders are available in two distinct form factors - desktop and wall-plug versions. If you are searching for a wire-free, less intrusive Netgear range extender design that blends seamlessly with your home decor, a wall-plug extender is an ideal option. Simply plug it into the wall and start enjoying the extended WiFi range. Conversely, if you need up to four Ethernet ports to connect multiple wired devices, a desktop extender will be the perfect choice for you. Here are some of the top WiFi extenders available:
- AC2200-Nighthawk X4S Tri-Band WiFi Mesh Extender (EX7500)
- Netgear AC1200-WiFi Range Extender (EX6150)
- AC1200-Dual Band WiFi Range Extender (EX6200)
- Netgear EX2700
- Netgear WN2500RP
- AC750-WiFi Range Extender (EX3110)
- AC3000-Nighthawk X6S Tri-Band WiFi Mesh Extender (EX8000)
- AC1750-WiFi Mesh Extender (EX6250)
These extender models will surely remove all the blind spots in your household and transform them into network efficient places. We hope now you will get to know how to setup Netgear WiFi extender.
Disclaimer: The website mywifilogon.com showcases images that do not belong to us. It operates as an independent service provider offering a wide range of third-party products, brands, and services. Any mention of trademarks, brands, products, or services on our platform is purely for reference purposes. We want to make it clear that mywifilogon.com has no direct association, affiliation, or representation with any of these brands, products, or services in any way. Our services are exclusively provided upon user request.
