 Skip to content
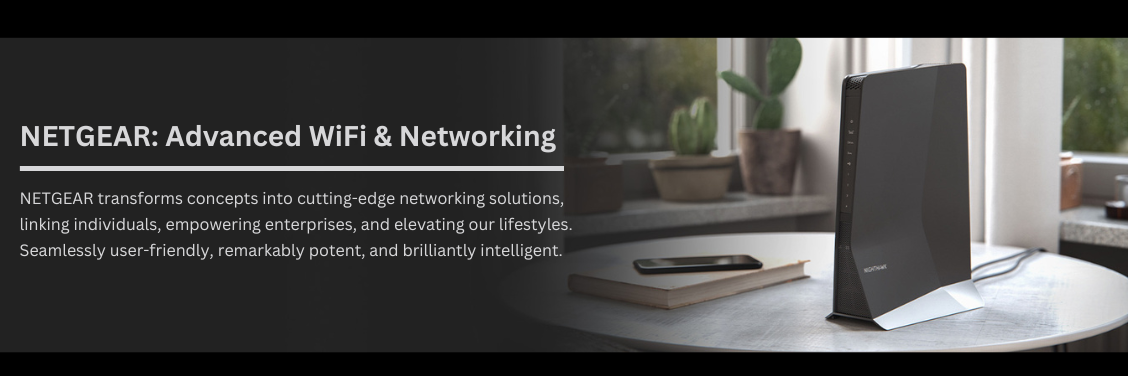
Chat With Us
What services do you need? Choose from over 30 different security subcategories and answers a few importans questions.
Mail With Us
What services do you need? Choose from over 30 different security subcategories and answers a few importans questions.
mailto: support@mywifilogon.comManage
What services do you need? Choose from over 30 different security subcategories and answers a few importans questions.
Finding the perfect Netgear is easy
mywifilogon.com serves as the online administrative hub for NETGEAR range extenders, enabling users to access and modify their WiFi password, SSID, and default configurations through the platform. Visit mywifilogon.com to log in and make these adjustments as needed.
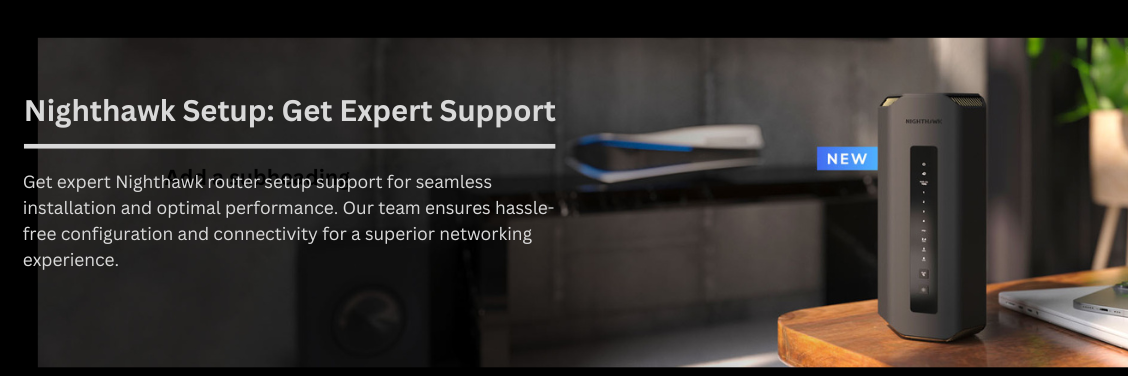
Netgear Setup and Login Success with Our Support
Experience a hassle-free Netgear router setup and login process with our dedicated support team. Follow our step-by-step guide for a successful setup, and get expert assistance whenever you need it.
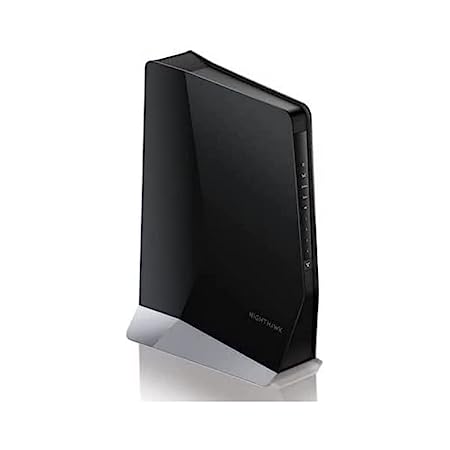
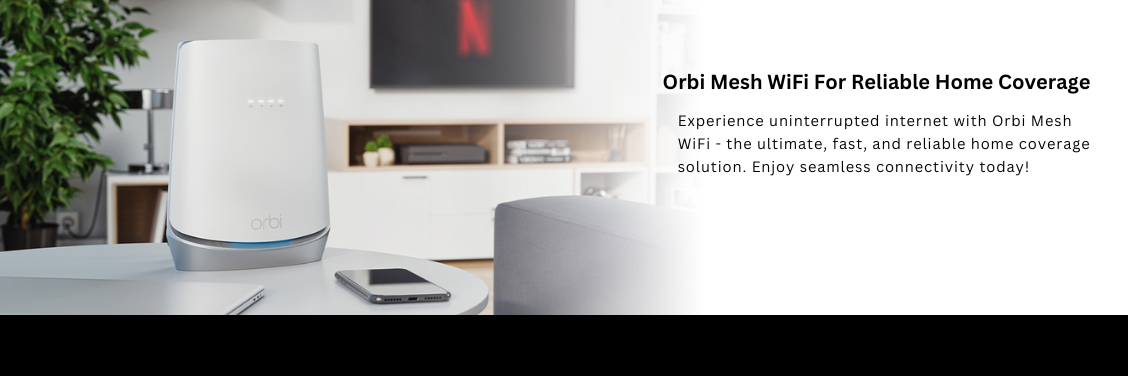
Netgear Dual Band WiFi 6 Mesh Extender
The Netgear Dual Band WiFi 6 Mesh Extender is a reliable and efficient solution to extend your existing WiFi coverage. With its advanced WiFi 6 technology, it delivers faster speeds and better performance.

NightHawkX45 Tri Band WIFI Mesh
The NightHawk X45 Tri-Band WiFi Mesh is an advanced networking solution designed to provide fast and reliable WiFi coverage throughout your home or office.
How to Setup Netgear Extender Step by Step Guide
Setting up a Netgear extender is a simple process that can be completed in just a few steps. Here's a step-by-step guide on how to do it:
Step-1:
Determine the Placement of the Extender The first step in setting up a Netgear extender is determining the optimal placement. It's recommended to place the extender in the same room as your wireless router for best results. The extender should be placed in an open area, away from any obstructions or metal objects.
Step-2:
Connect the Extender to Power After determining the placement of the extender, plug it into an electrical outlet and wait for the power LED to light up.
Step-3:
Connect the Extender to your Wireless Network To connect the extender to your wireless network, press the WPS button on the extender for 2 seconds, then press the WPS button on your router within 2 minutes. If your router does not have a WPS button, you can connect to the extender using a web browser. To do this, connect to the extender's Wi-Fi network, open a web browser, and enter www.mywifiext.net in the address bar.
Step-4:
Configure the Extender Once the extender is connected to your wireless network, you can configure it by logging in to the Netgear extender setup page. To do this, open a web browser and enter www.mywifiext.net in the address bar. Follow the on-screen instructions to configure your extender.
Step-5:
Place the Extender in its Final Location After configuring the extender, place it in its final location. You can move the extender around until you find the optimal location where it provides the best coverage.
Step-6:
Connect your Devices to the Extender Once the extender is in its final location, connect your devices to the extender's Wi-Fi network. You should now be able to enjoy an extended wireless network in your home or office.
Main Issues During Netgear Extender Setup
There are several potential issues that can arise during Netgear extender setup. Here are some of the most common ones:
- Poor or inconsistent Wi-Fi signal: If the Wi-Fi signal between the extender and your router is weak or inconsistent, you may experience difficulty setting up the extender. Make sure the extender is placed in a location where it can receive a strong and stable Wi-Fi signal from your router.
- Incorrect extender placement: If the extender is placed too far from your router or in an area with a weak Wi-Fi signal, it may not be able to effectively extend the Wi-Fi coverage in your home. Ensure that the extender is placed in a location that is central to the areas you want to extend the Wi-Fi coverage to.
- Incorrect login credentials: When setting up the extender, you will need to enter your Wi-Fi network name and password. If you enter the wrong credentials, the extender will not be able to connect to your router and extend the Wi-Fi signal. Double-check your login credentials to ensure they are correct.
- Compatibility issues: The extender may not be compatible with your router or other devices on your network. Make sure that the extender you are using is compatible with your router and any other devices you plan to connect to it.
- Firmware updates: If the extender's firmware is outdated, it may not work properly or may not be compatible with your router. Check for any available firmware updates for your extender and install them if necessary.
- Congestion: If there are too many devices connected to your network, the extender may not be able to effectively extend the Wi-Fi coverage. Try disconnecting some devices or upgrading to a higher bandwidth router to help alleviate congestion.
If you are still experiencing issues with your Netgear extender setup, you may want to consult the user manual or contact Netgear customer support for further assistance.
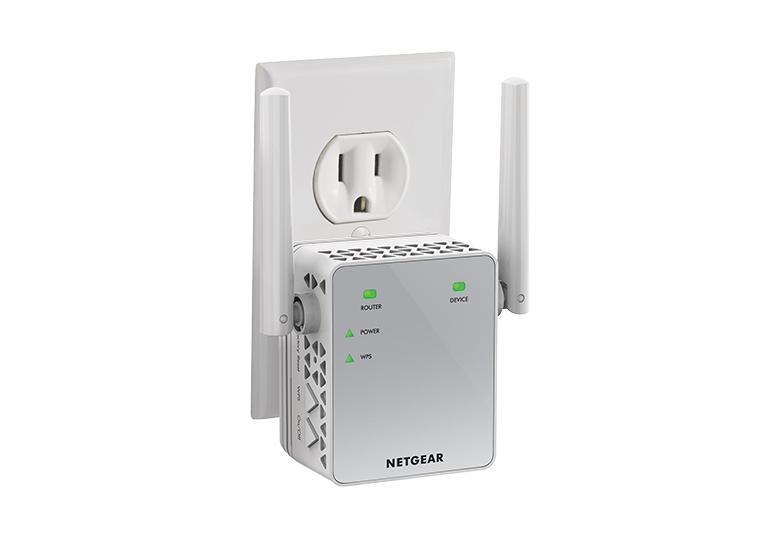
Netgear ex 7000 Setup
Here are the steps to set up your Netgear EX7000 extender:
- Place the extender in a central location between your router and the area where you want to extend the Wi-Fi signal.
- Plug in the extender and wait for the Power LED to light up.

- Connect a computer or mobile device to the extender's Wi-Fi network. The default Wi-Fi network name (SSID) and password (network key) can be found on the label on the extender.
- Open a web browser and type "https://mywifilogon.com" in the address bar.
- Follow the on-screen instructions to set up the extender. You may need to create a new admin account and choose a new Wi-Fi network name and password.
- Select the Wi-Fi network that you want to extend and enter the network password.
- Wait for the extender to connect to the Wi-Fi network.
- Once the connection is established, you will be prompted to move the extender to a new location, if necessary, for optimal Wi-Fi coverage.
- If you want to connect devices using an Ethernet cable, plug the devices into the Ethernet ports on the back of the extender.
- Once the setup is complete, connect your devices to the new Wi-Fi network that you set up on the extender.
Note: If you have any trouble accessing the setup page or following the on-screen instructions, you can also try using the Netgear Nighthawk app for easy setup and management of your extender.
What is www.mywifilogon.com?
If you're new to WiFi range extenders, you should be aware of mywifilogon.com, which is the default web address for WiFi extenders and has various uses. The primary benefit of mywifilogon local setup success is that it facilitates new extender installation. Additionally, mywifilogon.com offers several functionalities, such as customizing extender settings, upgrading firmware, and changing network name and password.
It's important to note that mywifilogon is not a typical website, but a local extender login web address provided by the manufacturer. To access it, the extender must be connected either by a wireless connection or Ethernet cable. Discover the incredible benefits of mywifilogon local setup success!
How to Turn an Old Router into a Wi-Fi Extender
If you have an old router lying around and want to extend your Wi-Fi coverage without breaking the bank, repurposing it as a Wi-Fi extender is a fantastic solution. In this comprehensive step-by-step guide, we'll walk you through the process of transforming your old router into a powerful Wi-Fi extender. By the end of this tutorial, you'll have a cost-effective way to enhance your wireless network coverage.
- Gather Your Materials:
Before you begin, make sure you have the following items on hand:
Old router, Ethernet cable, Computer or laptop, Internet connection - Reset the Old Router: To start, reset your old router to its default factory settings. This ensures that any previous configurations are cleared, and you have a clean slate to work with.
- Connect to the Old Router : Use an Ethernet cable to connect your computer or laptop to one of the LAN (Local Area Network) ports on the old router. This connection will allow you to configure the router's settings.
- Access Router Settings : Open a web browser and enter the router's default IP address (usually 192.168.1.1 or 192.168.0.1) into the address bar. You'll be prompted to log in to the router's admin panel. Use the default credentials (usually "admin" for both username and password) or consult the router's manual for the correct login information.
- Disable DHCP : Once you're logged in, navigate to the router's settings and disable the DHCP (Dynamic Host Configuration Protocol) function. This prevents conflicts with your main router's DHCP server.
- Configure Wireless Settings : Adjust the SSID (network name) and password of the old router to match your existing Wi-Fi network. This ensures seamless connectivity for your devices as they switch between the main router and the extender.
- Place the Old Router : Strategically position the old router in a location where it can effectively extend the Wi-Fi coverage. Optimal placement is usually halfway between the main router and the area with weak signal.
- Firmware Update : Check the manufacturer's website for any available firmware updates for your old router. Keeping the firmware up to date ensures optimal performance and security.
- Enjoy Extended Wi-Fi Coverage : Congratulations! You've successfully turned your old router into a Wi-Fi extender, providing enhanced coverage throughout your home or office. Enjoy a stronger and more reliable wireless connection without the need for expensive equipment.

Creating a Hidden Network with Netgear Extender
A hidden network, often referred to as a concealed network, provides an extra layer of security and privacy to your Wi-Fi setup. If you're a Netgear Extender user looking to enhance your network's security, creating a hidden network is an excellent option. In this step-by-step guide, we'll walk you through the process of setting up a hidden network using your Netgear Extender, ensuring that your Wi-Fi remains hidden from unwanted intruders while maintaining optimal performance.
- Step 1: Accessing the Netgear Extender Settings
- Step 2: Configuring the Hidden Network.

Change the WiFi Coverage Area
Are you facing WiFi dead zones in your home or office? A Netgear WiFi extender could be the solution you need to expand and enhance your WiFi coverage area. In this comprehensive guide, we'll walk you through the step-by-step process of changing the WiFi coverage area of your Netgear extender, ensuring seamless connectivity and improved internet performance.
- Step 1: Proper Placement
- Step 2: Connect to the Extender
- Step 3: Access the Extender's Settings
- Step 4: Adjust WiFi Coverage Area
- Step 5: Test and Optimize

Setup And Access Schedule
In today's digital age, a seamless and uninterrupted Wi-Fi connection is essential for staying connected and productive. Netgear, a renowned name in networking solutions, offers a range of extenders to enhance your Wi-Fi coverage. One of the standout features of Netgear extenders is the Setup and Access Schedule, which allows you to control and manage your network effectively. In this guide, we'll walk you through the process of setting up and utilizing the Access Schedule feature on your Netgear Extender for a customized and efficient Wi-Fi experience.
- Step 1: Setting Up Your Netgear Extender
- Step 2: Exploring the Access Schedule Feature
- Step 3: Benefits of Using Access Scheduling

Monitor The Connected Devices
Monitoring the connected devices of your Netgear extender is essential for maintaining a fast and reliable network. In this guide, we'll walk you through the process of monitoring and managing the devices connected to your Netgear extender, ensuring optimal network performance and a seamless online experience.
- Step 1: Access Your Netgear Extender's Web Interface
- Step 2: Navigate to the Connected Devices Section
- Step 3: View and Manage Connected Devices
- Step 4: Disconnect or Block Devices (if necessary)
- Step 5: Regularly Monitor and Update
Most Common Netgear WiFi Extender Issues
Netgear WiFi extenders are a great way to improve your wireless network's coverage and performance. However, like any other electronic device, they can also encounter issues from time to time. Here are some of the most common Netgear WiFi extender issues:
- Poor signal strength: This is one of the most common issues with WiFi extenders. The extender may be too far away from the router or may not be positioned correctly, resulting in weak signal strength.
- Connection drops: This occurs when the extender keeps disconnecting from the router, leading to unstable or no internet connection.
- Configuration issues: If the extender is not configured correctly, it may not work as expected.
- Compatibility issues: Some WiFi extenders may not be compatible with certain routers, resulting in connectivity problems.
- Firmware issues: Outdated or corrupted firmware can cause various problems, such as slow performance or unexpected reboots.
- Login problems: If you can't access the extender's login page, you may not be able to configure or manage the device.
- Security issues: Weak passwords or insufficient security settings can leave your network vulnerable to attacks.
To troubleshoot these issues, you may need to reset the extender, update the firmware, or adjust its settings. In some cases, contacting Netgear support may be necessary to resolve the issue.
Why is My WiFi Extender not Connecting?
There can be several reasons why your WiFi extender is not connecting to the network. Here are some common causes and solutions:
- Incorrect setup: Check to make sure that you have correctly set up the WiFi extender. Verify that you have entered the correct network name and password, and that the extender is connected to the right network.
- Signal strength: Ensure that the extender is placed in an area where it can receive a strong and stable signal from the router. If the extender is too far away from the router, it may not be able to connect.
- Firmware updates: Make sure that the firmware on the WiFi extender is up to date. Outdated firmware can cause connection problems.
- WiFi interference: Other wireless devices in the vicinity may be interfering with the WiFi signal. Try changing the channel on your router and extender to avoid interference.
- Power supply: Ensure that the extender is receiving power from a reliable source. If it is not receiving enough power, it may not connect to the network.
- Compatibility issues: Check to see if your WiFi extender is compatible with your router. If they are not compatible, they may not be able to connect to each other.
If none of these solutions work, you may need to contact Netgear support for further assistance.
My WiFi Extender Says no Internet. Why?
Many WiFi extender users are experiencing the frustrating issue of their extender saying "no internet." This problem can arise due to incorrect installation or a lack of proper internet connectivity from your Internet Service Provider.
To resolve the "WiFi extender says no internet" issue, start by pinging the router to which your extender is connected to check if you are receiving internet from your ISP. If the issue is not from your ISP, reset your range extender and reinstall it from scratch. If you need assistance setting up your WiFi extender quickly and easily, don't hesitate to contact our technical experts.
Netgear Router Not Connecting During Setup
Setting up a Netgear router is usually a straightforward process that involves a few simple steps to get your home network up and running. However, there may be instances when you encounter difficulties and your Netgear router fails to connect during the setup process. Don't fret – in this troubleshooting guide, we'll walk you through the common reasons for this issue and provide step-by-step solutions to help you get your Netgear router connected successfully.
- Check Hardware Connections
- Power Cycle
- Reset Your Router
- Disable VPN and Proxy Settings
- Disable Firewalls and Antivirus Software
- Use a Different Web Browser
- Firmware Update
Troubleshooting Netgear Extender Setup Not Working Issues
We will delve into common reasons behind Netgear extender setup not working and provide step-by-step solutions to help you get your extender up and running smoothly.
- Check Your Hardware
- Ensure Proper Connection
- Clear Cache and Cookies
- Disable VPN and Proxy
- Update Browser and Firmware
- Temporarily Disable Firewall
- Use a Different Device
Extender Device Light not On
Extender device light is not on, means, there is no device connected to it. Devices can be of any type Mobile phones, Laptops ,Ipad's etc.
There are few ways how we can fix it.
- Check the connection: First of all we need to check, the extender is properly connected to the power outlet and ensure there are no loose connections. Secondly, all others devices like modems, Wifi routers, adapters are connected properly.
- Check the Power Outlet: In it we need to check whether power outlet is working fine. We can try using different appliances on it or try using the extender on different power outlet. Power outlet without switch is recommended for continuous connection.
- Check the light: In it there is a possibility the light is not working fine or it has gone bad, if in case the devices are working properly. Secondly, if devices are not working, then we can try restarting the extender else it has gone bad and is the hardware issue.
- Contact Netgear: In case of hardware issue, contact Netgear for replacement or hardware repair.
